Overview
在上一篇iOS 10推送通知小记(上)中,已经将iOS 10推送机制的改进以及原理讲完了。本篇文章的着重点放在心的推送框架UserNotification.framework上面。
先说说iOS 10之前的推送API中存在的问题。比如,本地推送和远程推送使用的是不同的回调方法但有可能回调方法中的代码是重复的。当你的app将通知发送给用户之后就没办法再去控制它了。为了解决这些问题,iOS 10推出了新的推送框架——UserNotification.framework。
新框架的主要特性有:
- 与之前的API相似,改写原来的代码很简单。
- 扩展通知的内容。
- 本地推送和远程推送执行相同的回调方法。
- 简化代理方法。
- 更好的推送管理。app可以访问将被发送或者已经发送给用户的通知并且允许在更新通知的时候移除它。
- 通知内容可以展示app内的界面内容。
Registration
如今,通知消息对用户来说是种干扰或者打断。因此,在你给用户发送通知消息之前得到用户的授权和允许是非常重要的。你可以向用户请求横幅、声音或者app角标的权限,这样用户可以第一时间看到你的推送通知。本地推送与远程推送都需要做注册操作。
注册代码编写很简单,只需要调用UN的userNotification对象的request方法,并传入正确的参数即可。注意,现在用户对于每个应用允许的权限可以在应用的设置菜单中单独设置,用户可以依据个人的偏好去开启或关闭通知。在iOS 10中,开发者可以获取用户设置的权限,因而可以依据用户的偏好设置而发送对应的通知消息。
本地推送的注册到此就结束了,但是远程推送还没有结束。注册远程推送需要连接网络跟APNS进行通信获取设备的device token,你需要将这个token发送给应用的服务端。这个token非常重要,远程推送通知的负载需要包含这个token。device token相当于验证你的设备和应用程序之间的钥匙。
1 2 3 4 5 6 7 8 9 10
| UNUserNotificationCenter.current().requestAuthorization([.alert, .sound, .badge]) { (granted, error) in UNUserNotificationCenter.current().getNotificationSettings { (settings) in UIApplication.shared().registerForRemoteNotifications()
|
Content
在iOS 10中,推送通知加入了subtitle,可以给用户展示更多的信息。
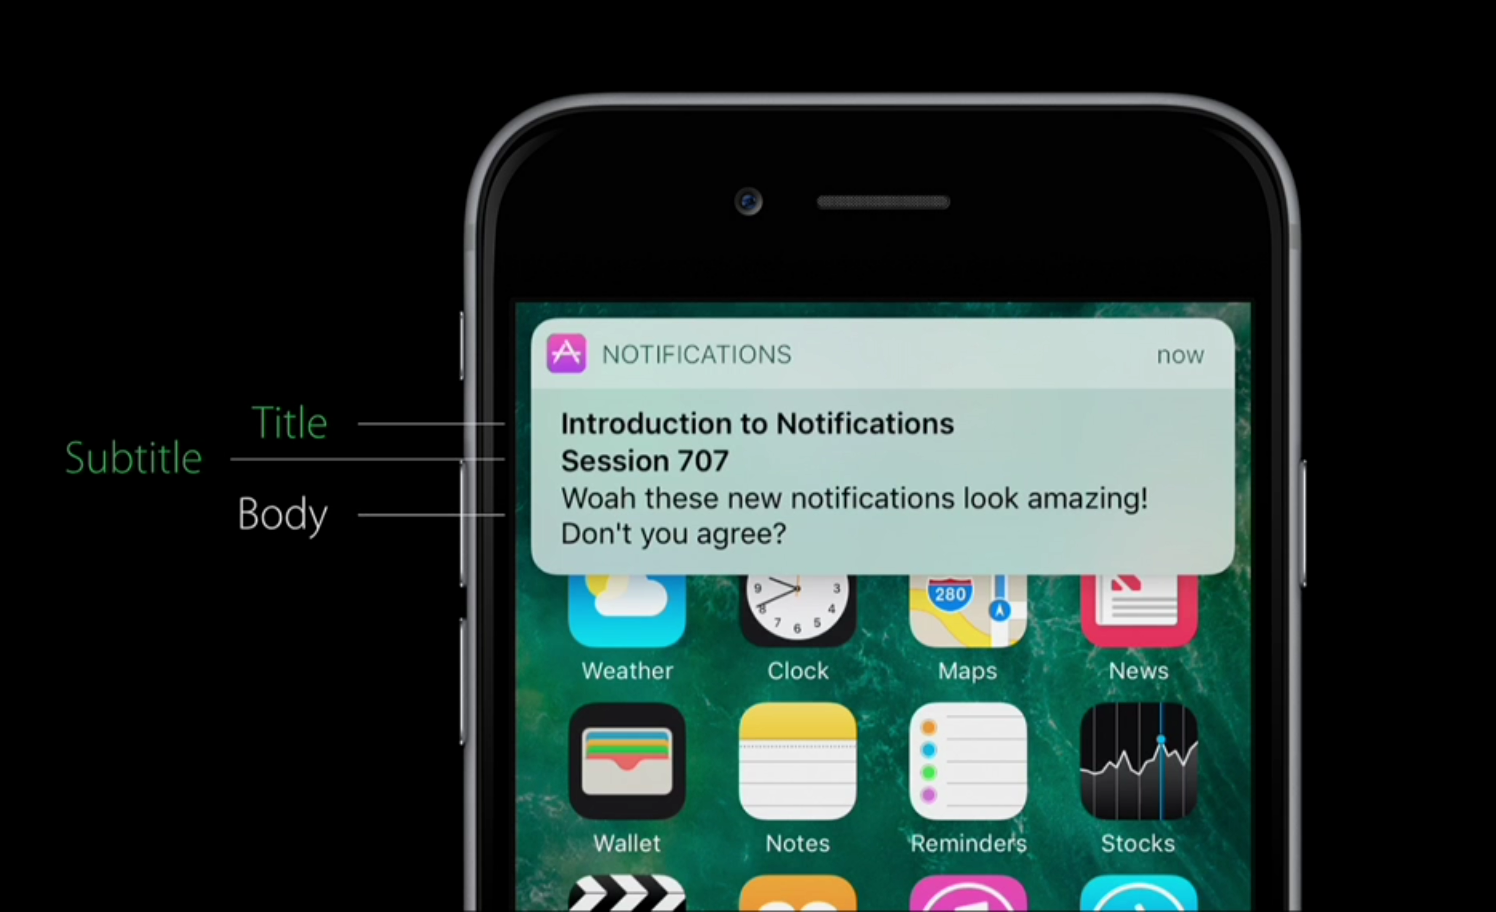
创建通知内容很简单,只需要创建UNMutableNotificationContent对象并且设置里面不同的属性就可以了。
1 2 3 4 5 6
| let content = UNMutableNotificationContent() content.title = "Introduction to Notifications" content.subtitle = "Session 707" content.body = "Woah! These new notifications look amazing! Don’t you agree?" content.badge = 1
|
1 2 3 4 5 6 7 8 9 10 11 12 13
| { "aps" : { "alert" : { "title" : "Introduction to Notifications", "subtitle" : "Session 707" , "body" : "Woah! These new notifications look amazing! Don’t you agree?" }, "badge" : 1 }, my-attachment : https: }
|
Scheduling
iOS 10发送通知的过程可以总结如下:
- 注册通知申请权限。
- 设置通知的内容
- 设置触发器
- 设置通知标识符
- 发送通知
1 2 3 4 5 6 7 8 9 10 11 12 13 14 15 16
| import UserNotifications UNUserNotificationCenter.current().requestAuthorization([.alert, .sound, .badge]) { (granted, error) in let content = UNMutableNotificationContent() content.title = "Introduction to Notifications" content.body = "Let's talk about notifications!" let trigger = UNTimeIntervalNotificationTrigger(timeInterval: 5, repeats: false) let requestIdentifier = "sampleRequest" let request = UNNotificationRequest(identifier: requestIdentifier, content: content, trigger: trigger) UNUserNotificationCenter.current().add(request) { (error) in
|
以上说的是应用程序在后台的时候推送通知的产生过程。那要是应用程序在前台运行呢?这时候我们需要实现UNUserNotificationCenter的代理方法才能支持在前台中处理推送通知。代理方法中有个叫做willPresent notification:,该方法能让你获取推送通知中的内容。如果你想设置弹窗、声音或者in-app显示,可以通过调用handlerBlock方法设置不同的参数达到效果。
1 2 3 4 5
| protocol UNUserNotificationCenterDelegate : NSObjectProtocol func userNotificationCenter(_ center: UNUserNotificationCenter, willPresent notification: UNNotification, withCompletionHandler completionHandler: (UNNotificationPresentationOptions) -> Void){ handlerBlock([.alert, .sound]) }
|
Management
在iOS 10新的推送框架中,推送通知的管理可以做的事情很多:
访问推送消息
- 将要发送的通知
- 已经发送的通知
移除推送消息
更新修改推送消息
在推送通知管理中非常重要的一部分是request identifier。在本地推送中,请求标识符被设置在消息请求当中,在远程推送中,请求标识符被设置在新的HTTP/2请求头中——apns-collapse-id。系统通过这个标识符知道哪个通知是需要移除或者更新的。
在下面例子中,你的app想发送关于游戏的通知,它想通知游戏开始的时间。因此你创建推送请求并且将其放入系统的schedule中。但是,现在需要告知游戏被取消了。这时候就需要调用removePendingNotificationRequests方法并传入创建推送请求时传入的标识符。那如何更新游戏的开始时间呢?你需要创建新的请求,并传入与之前相同的标识符,设置新的时间并放入系统的schedule中。
1 2 3 4 5 6 7 8 9 10 11
| let gameStartIdentifier = "game1.start.identifier" let gameStartRequest = UNNotificationRequest(identifier: gameStartIdentifier, content: content, trigger: startTrigger) UNUserNotificationCenter.current().add(gameStartRequest) { (error) in UNUserNotificationCenter.current().removePendingNotificationRequests(withIdentifiers: [gameStartIdentifier]) let updatedGameStartRequest = UNNotificationRequest(identifier: gameStartIdentifier, content: content, trigger: newStartTrigger) UNUserNotificationCenter.current().add(updatedGameStartRequest) { (error) in
|
下面再来说说通知已经发送出去的情况。我们举足球比分的例子来说明。你创建了通知请求并将其发送到系统。但是通知更新的是错误的比分,这时候你可以很简单地通过调用removeDeliveredNotifications来移除之前的通知。当然,你也可以创建新的推送请求更新原来通知的比分。当然,这两种做法都要传入相同的请求标识符。
1 2 3 4 5 6 7 8 9 10 11 12 13
| let gameScoreIdentifier = "game1.score.identifier" let gameScoreRequest = UNNotificationRequest(identifier: gameScoreIdentifier, content: scoreContent, trigger: trigger) UNUserNotificationCenter.current().add(gameScoreRequest) { (error) in UNUserNotificationCenter.current().removeDeliveredNotifications(withIdentifiers: [gameScoreIdentifier]) let updateGameScoreRequest = UNNotificationRequest(identifier: gameScoreIdentifier, content: newScoreContent, trigger: newTrigger) UNUserNotificationCenter.current().add(updateGameScoreRequest) { (error) in
|
Actions
下面介绍用户接收到推送通知后的处理操作。app可以识别用户对于通知消息处理的三种类型操作。
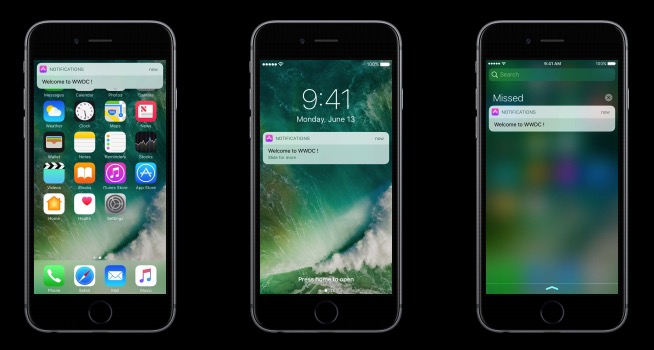
第一种类型操作是最常规的,那就是用户点击推送消息打开app。这个操作可以在设备解锁并且接收到推送消息,用户点击横幅时发生。也可以在锁屏状态下用户向右滑动消息,在下拉通知中心点击消息发生这个操作。
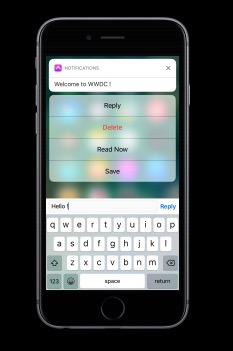
第二种类型操作是自定义快捷操作行为。这时候的推送消息就是可以执行操作的消息。这些自定义操作行为以按钮的形式出现在推送消息的下面。在iOS 9中引入了textinput action,这样用户可以快速回复消息。这些自定义的快捷操作行为可以在前台可以在后台中。
在后台中执行action会移除消息并且会给后台很短的一段时间去处理用户点击的action触发的事件。另一方面,在前台中执行action会移除消息并且启动app这样app就可以处理action触发的事件。
所有的自定义快捷操作都需要与category关联起来。category需要唯一的标识符,这个标识符会设置到所有你想要的action中。除此之外,你还可以设置intent标识符,关于intent的更多信息可以参考SiriKit Session。当你创建完所有的action和category时,你需要做的唯一的事情就是将它们注册到UNUserNotificationCenter对象中与你的应用程序相关联。
1 2 3
| let action = UNNotificationAction(identifier:”reply",title:"Reply",options:[]) let category = UNNotificationCategory(identifier: "message", actions: [action], minimalActions: [action], intentIdentifiers: [], options: []) UNUserNotificationCenter.current().setNotificationCategories([category])
|
1 2 3 4 5 6 7 8 9 10
| { aps : { alert : “Welcome to WWDC !”, category: "message" } } content.categoryIdentifier = "message"
|
接下来说说如何将自定义的aciton展示给你的用户。在远程推送中,你需要在远程推送通知的APS字典中设置category标识符。现在这个标识符需要与之前注册的category标识符能匹配上。在本地推送中,你需要在创建的推送内容中设置category标识符。同样的,这个category标识符必须与注册的category标识符能匹配上。
第三种类型操作是dismiss行为。该行为在用户移除指定的通知消息时触发。比如说,你有个日历app,你给用户发送了一条关于即将到来的会议的远程推送通知。用户看到了这则通知并移除它时,你想要停止向该用户其他的设备再发送这条用户已经看到的远程推送通知。那用户如何才算是真正地移除通知消息呢?用户可以在锁屏界面或者下拉通知中心中从右向左滑动消息并点击“清除”按钮。
在之前讨论的注册不同的category时,我们提到一些选项,customDismissAction选项是其中的一个。我们需要做的是将customDismissAction添加到category中,那么当用户移除跟category关联的通知消息时,app将会接收到dismiss行为。
1 2 3
| customDismissAction: UNNotificationCategoryOptions let category = UNNotificationCategory(identifier: "message", actions: [action], minimalActions: [action], intentIdentifiers: [], options: [.customDismissAction])
|
以上就是关于自定义通知行为的三种类型的介绍。那么自定义行为的操作的处理在哪里进行呢?在UNUserNotificationCenter代理方法中有这样一个方法——didReceive response:,实现这个方法来处理自定义行为的操作。
1 2
| protocol UNUserNotificationCenterDelegate : NSObjectProtocol func userNotificationCenter(_ center: UNUserNotificationCenter, didReceive response: UNNotificationResponse, withCompletionHandler completionHandler: () -> Void)
|
我们把目光聚焦到该方法中的UNNotificationResponse上。这个对象中包含你创建的action的action identifier,如果这个action是text input action,那还会有user text属性。它还包含一个通知消息对象,消息对象中自然还包含请求对象以及标识符。

Service extension
再来谈谈远程推送。iOS 10引入了service extension,它的作用是在远程推送中在推送通知展示到用户之前添加或者修改通知消息中的内容,同时,还会对消息中的内容进行端对端的加密。注意,它是在后台运行工作的。关于service extension工作原理的介绍已经在前一篇文章中解释过了。现在重点讲述如何代码实现service extension。
首先,你需要做的是在Xcode项目中添加新的target,如下图所示。
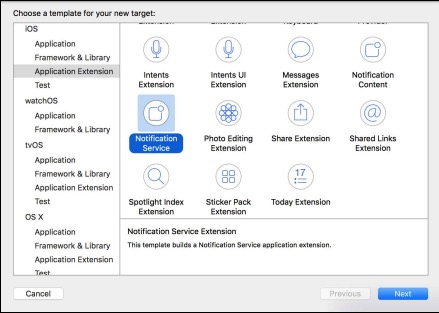
之后在这个模板中会有一个类。它是UNNotificationServiceExtension类的子类。它有两个主要的方法。第一个方法可以获取当前的推送请求对象,可以在其中修改推送消息的内容。当service extension运行超时时,第二个方法会被触发。
1 2 3 4 5 6 7 8 9 10
| import UserNotifications class NotificationService: UNNotificationServiceExtension { override func didReceive(request: UNNotificationRequest, withContentHandler contentHandler:(UNNotificationContent) -> Void) { } override func serviceExtensionTimeWillExpire() { } }
|
接下来我们来看看如何在远程推送中真正地触发上面这段代码。下面是远程推送消息的简易版本,其中有一个新的mutable-content字段。你需要用这个字段来让系统知道你想要系统启动service extension去更新远程推送消息中的内容。当然你不必每次都去启动service extension服务,只需要在需要更新推送通知内容的时候再去启动它。
1 2 3 4 5 6 7 8
| { aps : { alert : “New Message Available”, mutable-content : 1 }, encrypted-content : “#myencryptedcontent” }
|
我们再来看看如何去解密远程推送通知中加密的内容。在下面代码中,我们看到了didReceive方法。该方法是推送请求的方法,在这个方法中要做的事情就是解密远程推送通知中加密的内容。然后,我们创建一个UNMutableNotificationContent对象并将解密出来的内容赋给它。最后,我们调用contentHandler方法将解密的内容展示在用户面前。
1 2 3 4 5 6 7 8 9 10
| override func didReceive(request: UNNotificationRequest, withContentHandler contentHandler:(UNNotificationContent) -> Void) { let decryptedBody = decrypt(request.content.userInfo[“encrypted-content”]) let newContent = UNMutableNotificationContent() newContent.body = decryptedBody contentHandler(newContent) }
|
